Baking vs. Cooking vs. Light Dusting: I Tested Every Setting Powder Method on My Oily Skin
Beauty & Skincaresetting powderoily skinbaking makeupcooking methodBlack OpalHuda Beautymelanin-rich skinmakeup techniques
Look — I have oily skin. Not "a little dewy by 3 PM" oily. I mean my T-zone has its own weather system. By noon, my foundation is sliding off like it's trying to escape, and my concealer? Gone. Ghosted. Left no forwarding address.
So yeah, I've tried every setting powder method that exists. Baking. Light dusting. The "cooking" method that keeps popping up on TikTok. I've sat with powder caked under my eyes for 10 minutes looking like a ghost because someone on the internet told me it would change my life.
Some of it worked. Some of it was a straight-up lie. Here's what actually happened when I tested all three methods on my oily, melanin-rich skin — because most of these tutorials are filmed on people who don't sweat through their primer by lunchtime.
Method 1: Classic Baking
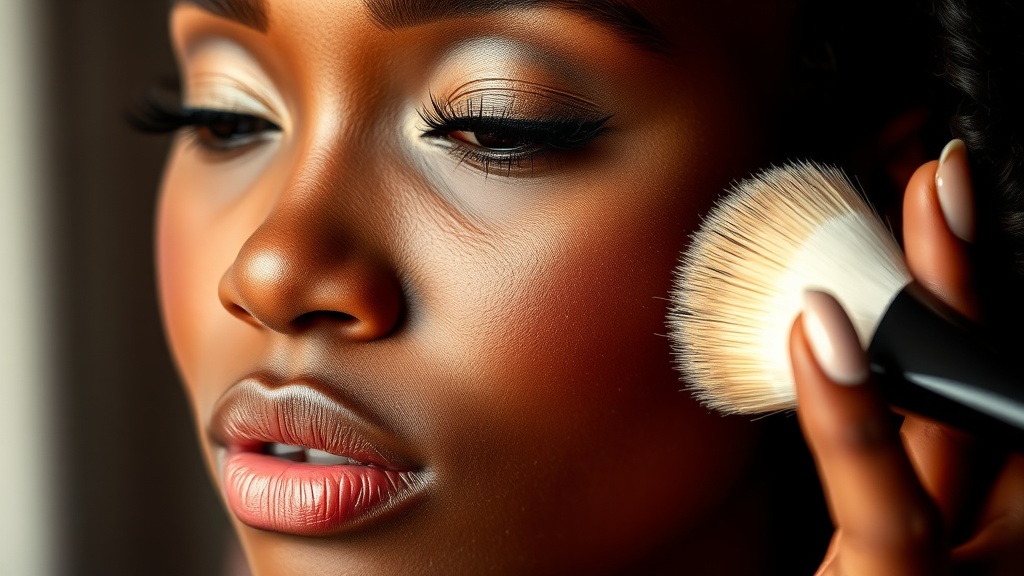
You know this one. It came from drag culture, and it works exactly like it sounds — you pack on a thick layer of loose translucent powder under your eyes and on your T-zone, let it sit for 5-10 minutes while the heat from your skin "cooks" the product underneath, then dust off the excess. What I used: Huda Beauty Easy Bake in Cupcake (the shade actually shows up well on deeper skin tones without leaving that ashy white cast — which, if you know, you KNOW is the main problem with most "translucent" powders on dark skin). What happened: My undereyes were SNATCHED. Like, creaseless for a solid 6 hours. My T-zone stayed matte through a Brooklyn summer subway ride, which is basically a steam room. The look lasted through dinner. The catch: It emphasized every single texture on my forehead. Every little bump, every dry patch around my nose — magnified. If your skin isn't perfectly smooth (and whose is?), baking can make you look like you're wearing a mask. It photographs well, but in person? It can read heavy, especially in daylight. My verdict: Save it for nighttime looks, events, and photos. It's not an everyday technique unless you genuinely produce enough oil to fry an egg on your face by 2 PM. If that's you — no shame, I've been there — bake away. But maybe just the undereyes and chin, not the whole face.Method 2: Light Dusting (The "Normal" Way)
This is what most makeup artists actually recommend for daily wear. Apply your foundation and concealer, take a fluffy brush, pick up a small amount of setting powder, and lightly sweep it where you need it. No waiting. No caking. Just a quick, thin layer. What I used: Saie Airset Radiant Loose Setting Powder. Also tested with the Black Opal True Color Soft Velvet Finishing Powder because I wanted to compare a brand that actually formulates with deeper skin tones in mind. What happened with Saie: Pretty, natural finish for about 3 hours. Then my nose became a slip-and-slide. Cute powder, but it's built for normal-to-dry skin people who think "oily" means they got a little shiny after hot yoga. Not built for us. What happened with Black Opal: WAY better. The shade match was seamless (no flashback, no ashiness), and it actually controlled oil for about 5 hours. Not miraculous, but functional. The finish looked like skin, not like I'd applied product. And it's under $12, which is honestly criminal for how well it works. My verdict: Light dusting is the move for everyday if you pick the RIGHT powder. Most "universal" translucent powders are universal for exactly one skin tone range, and it's not ours. Black Opal understood the assignment. If you're combo-to-oily, a light dust with a good powder plus blotting papers at midday is genuinely all you need for work or casual outings.Method 3: The "Cooking" Method (TikTok's Latest)
This one's been all over my FYP. The cooking method is basically baking's chill younger sibling. You apply your powder the same way as baking — pressed on with a damp sponge — but you only leave it for 1-2 minutes instead of 5-10. The idea is you get some of the crease-proofing and oil control of baking without the cakey, textured finish. What I used: Same Huda Easy Bake, applied with a damp Real Techniques sponge. Two minutes, then dusted off. What happened: Honestly? This might be the sweet spot. My concealer set without creasing, my T-zone stayed controlled for about 5 hours, and the finish wasn't nearly as flat or heavy as full baking. It looked more like my actual skin with a soft-focus filter — which is exactly what I want my makeup to look like. The catch: Timing matters more than you'd think. I tried 3 minutes once and it was already tipping into baking territory. And if your sponge is too wet, the powder clumps instead of setting. You want damp, not dripping. My verdict: This is my new daily method for when I know I'll be out for more than 4 hours. It's the Goldilocks of setting techniques — enough hold without looking like I troweled on product.The Shade Conversation Nobody Wants to Have
Here's the thing that annoys me about 90% of setting powder content: they recommend "translucent" powder like it's one universal product. It's not. Most translucent powders have a white or yellow base that deposits a visible cast on skin deeper than about a medium tan. It's not subtle. It's straight-up ashy. If you're above a medium skin tone, you need either:- A tinted setting powder that matches your undertone (Black Opal, Huda's deeper shades, Fenty Pro Filt'r in deeper shades)
- A truly colorless powder (rare — Dermablend and RCMA are decent options)
- Or just skip the "translucent" label entirely and use a finely milled finishing powder in your shade range
My Final Ranking
- Cooking method — best all-around for daily oily skin management. Control without compromise.
- Light dusting with Black Opal — best for minimal-makeup days when you still need oil control.
- Full baking — best for events, photos, and going-out looks. Too heavy for daylight everyday wear.
The Products Worth Your Money
- Huda Beauty Easy Bake (~$39) — the standard for a reason. Get a shade that works for you, not just "translucent."
- Black Opal Soft Velvet Finishing Powder (~$12) — criminally underrated. Perfect for deeper skin tones.
- Fenty Beauty Pro Filt'r Setting Powder (~$36) — excellent shade range, true to color, good oil control.
- Real Techniques Miracle Powder Sponge (~$8) — if you're cooking or baking, a dedicated powder sponge makes a difference vs. using your foundation sponge.